Table of Contents
LAB1: Ogre Startup Sequence
This first Lab assignment is intended to get the Ogre3D environment started. Getting the development environment set up and configured can be a little tricky for the first time, so this Lab will be solely used to get the “Hello World” of Ogre3D built.
There will be a pdf guide that will take you through the basic application step by step. I strongly encourage you to try to understand the steps not just writing it down like a zombie parrot, as the follow up Labs will all be built on top of the base you create in Lab 1.
Discussion
Discussion thread for this lab will be on Piazza: Lab 1 Discussion Thread. Please don't hesitate to ask questions or comment on the Lab assignment.
Preparation
- Download and install C++ development environment, the instructions will assume you are using the MS Visual C++ Express 2010 environment, which you can get for free. You're free to use other environments or platforms as long as you take care of making it work on your own (with the help of the Internet).
- Download and install OGRE 1.9 SDK for Visual C++ 2010 (32-bit). I recommend extracting this to a folder with a relatively short path and no spaces. E.g. into “C:\OgreSDK”. You are free to use other versions, but be advised you will be rowing your own boat if problems arise :)
To prepare your environment and project you need to:
- Create a system environment variable “OGRE_HOME” that points to Ogre SDK folder. You can then refer to this variable in your project setup as $(OGRE_HOME). This is so that you can easily take your project to a different machine where Ogre might be installed in a different folder. If each machine defines this variable, the project should be able to find the needed includes and libraries (see below).
example: C:\Ogre1.9_vc100\OgreSDK_vc10_v1-9-0 - The Ogre run-time libraries (DLLs) are in folders called bin/debug and bin/release inside the SDK folder. You need to add these two folders to your system path variable so that the system can find them when you launch your application.
- It is good to organize all your lab source code, from the very beginning of this class to avoid a complete mess later. VC++ helps you organize the code into solutions and projects. A solution is really a collection of projects, which is a great way to keep track of labs. Once you launch VC++, create a new project called “Lab1” inside a new solution called “GEDE2015” (it is a good idea to let VC++ create a folder for your solution - use the check box - and then your projects will appear inside that folder). The project should be a
WIN32 Console Applicationand completely empty. You will write it from scratch. - Right-click on your project inside VC++ project explorer and choose
properties. Add Ogre folders and files in several locations within the properties:Note:
We will be changing configurations for debug builds as well as release builds. So take note that the strings are not always the same for both builds. - Change your build output directory: Configuration Properties→General→Output Directory
Add$(ProjectName)\at the end of the output directory so it will look like:$(SolutionDir)$(Configuration)\$(ProjectName)\
This will help with organizing the builds for each lab project.
- Add additional include libraries: C/C++→General→Additional Include Directories = Notice, for all configurations!
$(OGRE_HOME)\include\OIS;$(OGRE_HOME)\include\OGRE;$(OGRE_HOME)\include;$(OGRE_HOME)\boost;%(AdditionalIncludeDirectories)
Note:
If the C/C++ tab is missing. For some reason, with some versions of Visual Studio you will need to have created a cpp file in order to get the C/C++ tab in the configuration properties, so adding a main.cpp file with a basic “hello world” to the project and building it will suffice. )
- Add connections to additional Ogre and input libraries: Linker→Input→Additional Dependencies
Debug:   OgreMain_d.lib;OIS_d.lib;%(AdditionalDependencies)
Release: OgreMain.lib;OIS.lib;%(AdditionalDependencies)
Note:
Add this to the end of the current string, do not replace it, and make sure to seperate it with a semicolon.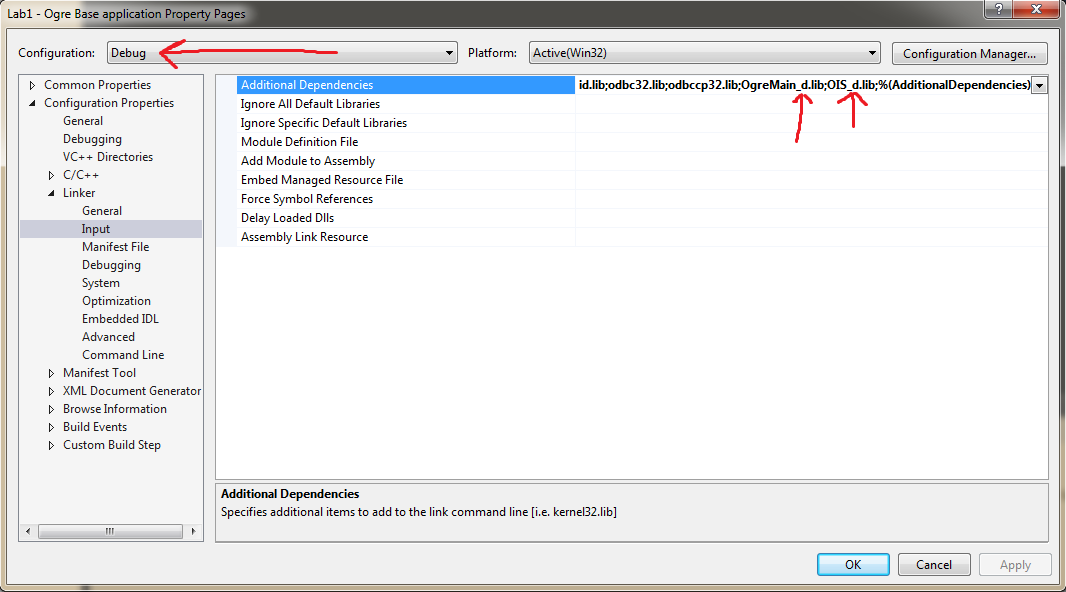

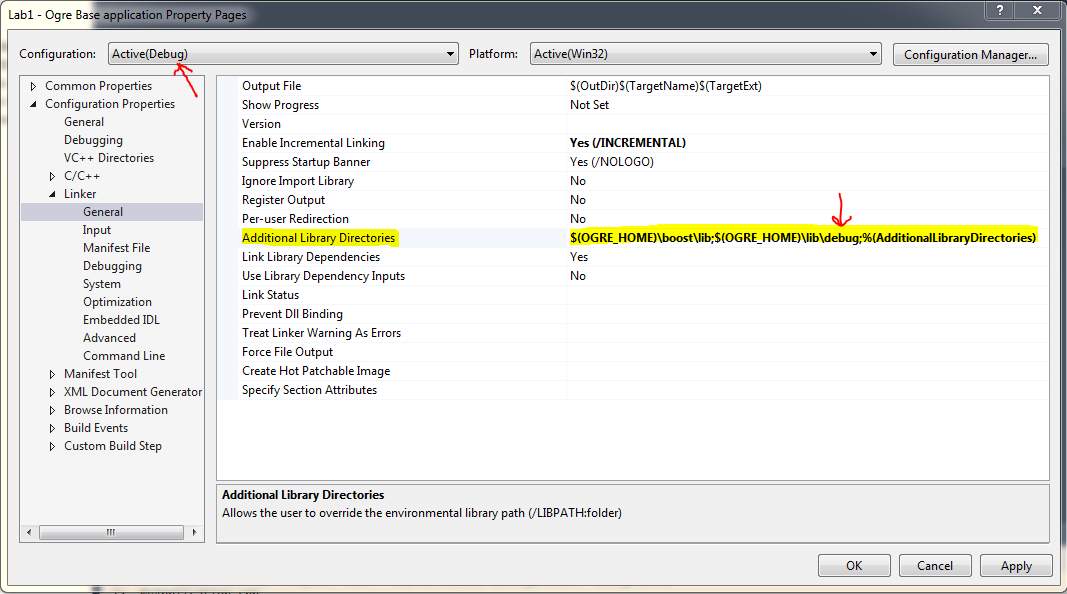
- Also you will need to add additional Library folders where the Ogre specific libraries and the required boost libraries are stored: Linker→General→Additional Library Directories =
Debug: $(OGRE_HOME)\boost\lib;$(OGRE_HOME)\lib\debug;%(AdditionalLibraryDirectories)
Release: $(OGRE_HOME)\boost\lib;$(OGRE_HOME)\lib\Release;%(AdditionalLibraryDirectories)

- If you are using a different version of Visual studio than 2010, make sure to be using the vc100 toolset
Project Configuration->General->Platform Toolset = Visual Studio 2010 (v100)
Note:
If the v100 toolset is not available, you will need to install VS 2010 express, whether you use it or not, or at least the correct VC++ toolset
- Set up the engine configuration files.
- Now navigate to your solution folder
In my case: C:\Code\GEDE2015_Ogre_Labsand create a new Folder calledLabFiles, - In the folder LabFiles, create another folder called
OgreConfig - In
<OGRE SDK folder(same as OGRE_HOME)>/bin/debug/you will find two filesresources_d.cfgandplugins_d.cfg, copy those two into the folderOgreConfigfrom the previous step.Note:
Plugins_d.cfg directs the Ogre application to what modules and plugins it should load (Rendering engine, scene manager etc…). The resources however are what the Ogre application uses (such as 3D models, shaders, particle systems). We put them in a separate directory so that we can reuse the configurations between projects. - One final thing before we can start coding, edit the resources_d.cfg file, and replace all instances of
../..with the path to the root of your Ogre SDK(again same as OGRE_HOME). - We will be adding more files to the
LabFilesPlease try to keep file and folder names the same as in the examples so it won't be a nightmare for me to review them :)
Lab Project
You should now follow the guide from “Ogre3D 1.7 Beginners Guide by Felix Kerger” which you can get Here.
For this Lab we will only do the sections 1 - 3 of the Ogre 3D beginners Guide. The rest will be covered in the next Lab assignment.
The first 2 labs will be following this guide and getting familiar with the Ogre3D environment.
Important:
In step 1.2 change the path from plugins_d.cfg to ../LabFiles/OgreConfig/plugins_d.cfg
Ogre::Root* root = new Ogre::Root("../LabFiles/OgreConfig/plugins_d.cfg");
Additionally in step 3.1 change the path from resourcfes_d.cfg to ../LabFiles/OgreConfig/resourcfes_d.cfg
cf.load("../LabFiles/OgreConfig/resources_d.cfg");
After line 2 in section 2 of the Guide, please add this line to the code. Since the Ogre 1.9 default Scene Manager does not set the ambient light by default like back in 1.7, we have to that our selves.
sceneManager->setAmbientLight(Ogre::ColourValue(0.3f, 0.3f, 0.3f));
A friendly note: In the guide #include “OGRE/Ogre.h” makes compiler go through a lot of jargon you are not using making compilation times horrible. Try to include only what you need, like so for Ogre::Root* #include “OGRE/OgreRoot.h”.
When you manage to run your first application and get the configuration dialog after section 1 of the guide, Do not run it in fullscreen! Especially if you run it through the VS environment :)
Finally after you successfully render your first window, black or with Sinbad, do the following.
- Navigate to <your solution directory>/(Debug or Release depending what you built). There should be a directory for your first Lab project.
- In the first lab directory you should find
ogre.cfg, move it to the folder<solution dir>/LabFiles/OgreConfig/ - Change the line
Ogre::Root* root = new Ogre::Root("../LabFiles/OgreConfig/plugins_d.cfg");
to
Ogre::Root* root = new Ogre::Root("../LabFiles/OgreConfig/plugins_d.cfg","../LabFiles/OgreConfig/ogre.cfg");
- This will guarantee that you will always be using the same configuration for all runs independent of the project you are working on.
Your final results should look something like this:

CODE
#include "OGRE/OgreRoot.h"
#include "OGRE/OgreSceneManager.h"
#include "OGRE/OgreSceneNode.h"
#include "OGRE/OgreRenderWindow.h"
#include "OGRE/OgreConfigFile.h"
#include "OGRE/OgreEntity.h"

int main()
 {
 	Ogre::Root* root = new Ogre::Root("../LabFiles/OgreConfig/plugins_d.cfg","../LabFiles/OgreConfig/ogre.cfg");

	if(!root->showConfigDialog()) {
		return -1;
	}

	Ogre::RenderWindow* window = root->initialise(true, "Ogre3D Beginners Guide");

	Ogre::SceneManager* sceneManager = root->createSceneManager(Ogre::ST_GENERIC);

	Ogre::Camera* camera = sceneManager->createCamera("Camera");
	camera->setPosition(Ogre::Vector3(0,0,30));
	camera->lookAt(Ogre::Vector3(0,0,0));
	camera->setNearClipDistance(5);

	Ogre::Viewport* viewport = window->addViewport(camera);
	viewport->setBackgroundColour(Ogre::ColourValue(0.0,0.0,0.0));

	camera->setAspectRatio(Ogre::Real(viewport->getActualWidth())/Ogre::Real(viewport->getActualHeight()));

	Ogre::String sectionName, typeName, dataName;
	Ogre::ConfigFile cf;
	cf.load("../LabFiles/OgreConfig/resources_d.cfg");
	Ogre::ConfigFile::SectionIterator sectionIter = cf.getSectionIterator();

	while(sectionIter.hasMoreElements()) {
		sectionName = sectionIter.peekNextKey();
		Ogre::ConfigFile::SettingsMultiMap *settings = sectionIter.getNext();
		Ogre::ConfigFile::SettingsMultiMap::iterator i;
		for( i = settings->begin() ; i != settings->end() ; ++i ) {
			typeName = i->first;
			dataName = i->second;
			Ogre::ResourceGroupManager::getSingleton().addResourceLocation(dataName, typeName, sectionName);
		}
	}

	Ogre::ResourceGroupManager::getSingleton().initialiseAllResourceGroups();

	Ogre::Entity* ent = sceneManager->createEntity("Sinbad.mesh");
	sceneManager->getRootSceneNode()->attachObject(ent);

	sceneManager->setAmbientLight(Ogre::ColourValue(.3f,.3f,.3f));

	root->startRendering();

	return 0;
}
When You Are Finished
This lab projects will not be graded, but their completion counts towards your labs grade.